Help Center
Automation
Introduction: The Automations Module in LeadIS not only enables custom workflows but also allows users to break down messaging into precise time intervals. This ensures timely communication with leads, based on their lead status or scheduled appointments. The flexibility to configure messages after a status is set, before an event, or after an event adds significant value to your engagement strategy.

Key Features of the Automations Module:
- Create Custom Flows:
- Build automations for specific platforms (e.g., SMS, email).
- Trigger workflows based on lead statuses (e.g., New Lead, Hot Lead).
- Platform-Specific Actions:
- Choose the communication provider (e.g., SMS, Email, WhatsApp).
- Customize actions depending on your lead management strategy.
- Lead Status Triggers:
- Set automation triggers based on a lead’s status in your pipeline, ensuring timely engagement.
How to Create an Automation Flow:
- Navigate to the Automations Module:
- Click the Automation tab in the top navigation menu.
- Start Creating a New Flow:
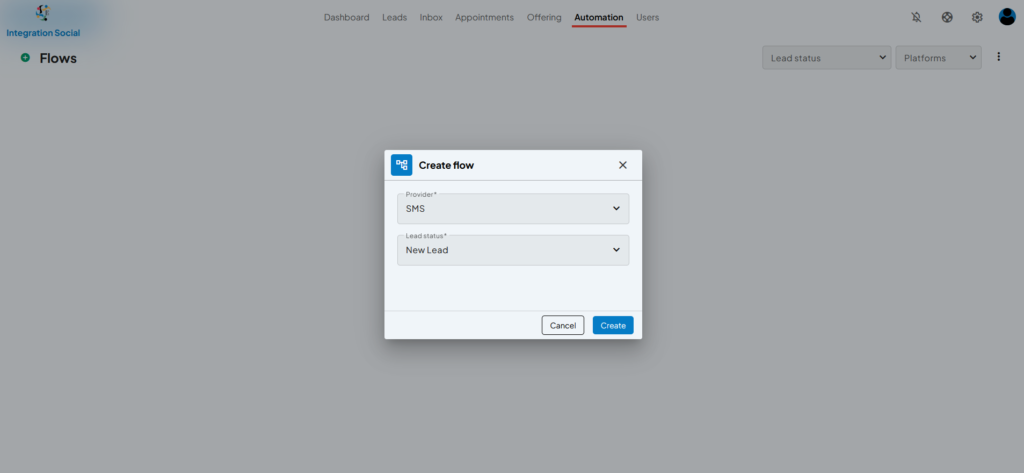
- Click the + Flows button to open the Create Flow popup.
- Select a Provider:
- From the Provider dropdown menu, select the platform where the automation will run (e.g., SMS).
- Set the Lead Status:
- Choose the trigger lead status from the Lead Status dropdown (e.g., New Lead).
- Save the Flow:
- Click Create to finalize the automation flow.
- The new flow will now be listed under the Flows section of the Automations Module.

Key Features of Time Interval Messaging:
- Automated Messaging by Intervals:
- Create messages that are automatically sent at specific times after a lead’s status is updated.
- Configure reminders or follow-ups before or after an event (e.g., appointments).
- Flexible Timing Options:
- Schedule messages to be sent:
- Immediately after a status is set.
- At predefined intervals (e.g., 15 minutes, 2 hours).
- Before or after an event (e.g., 2 hours before an appointment).
- Schedule messages to be sent:
- Message Templates with Dynamic Fields:
- Use placeholders (e.g.,
{{Customer.FirstName}},{{Business.Name}}) to personalize messages.
- Use placeholders (e.g.,
How to Configure Time Interval Messaging:
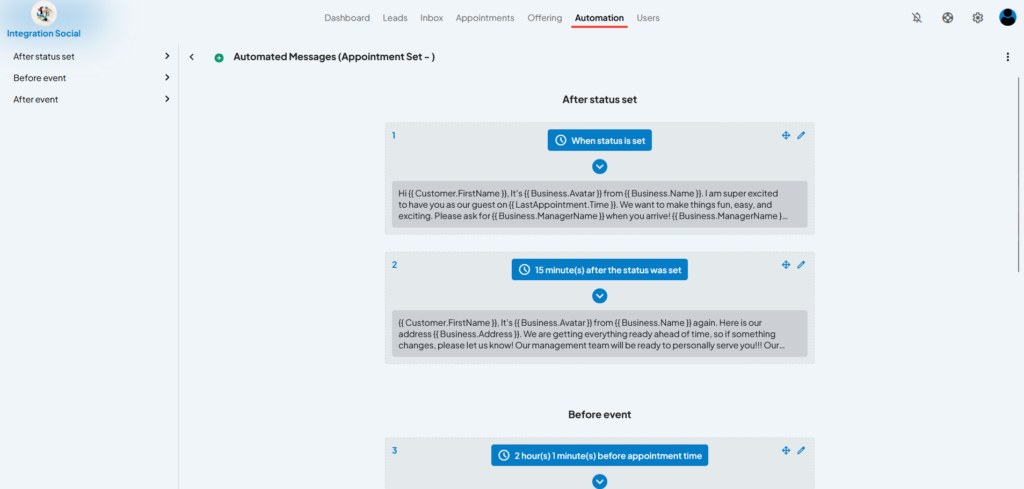
- After Status is Set:
- Example Workflow:
- Step 1: A message is sent immediately after the status is updated to “Appointment Set.”
- Message: “Hi {{Customer.FirstName}}, we are excited to have you visit {{Business.Name}} for your appointment at {{LastAppointment.Time}}!”
- Step 2: A follow-up message is sent 15 minutes after the status update.
- Message: “Here is the address for {{Business.Name}}: {{Business.Address}}. If there are any changes, please let us know!”
- Step 1: A message is sent immediately after the status is updated to “Appointment Set.”
- Example Workflow:
- Before an Event:
- Example Workflow:
- 2 hours before the appointment, send a reminder message:
- Message: “Hi {{Customer.FirstName}}, just a reminder about your upcoming appointment at {{Business.Name}}. We look forward to seeing you soon!”
- 2 hours before the appointment, send a reminder message:
- Example Workflow:
- After an Event:
- Example Workflow:
- Send a message 2 hours after the appointment thanking the lead for their visit or requesting feedback.
- Example Workflow:
- Customizing Intervals:
- Use the settings to define the exact timing for each message in minutes, hours, or days.
Benefits of Time Interval Messaging:
- Improved Engagement: Timely reminders and follow-ups keep leads engaged.
- Personalization: Dynamic fields ensure each message feels tailored.
- Efficiency: Automations reduce the manual effort required for consistent communication.
Example Use Case:
- Provider: SMS
- Lead Status: New Lead
- Automation Goal: Automatically send a welcome message to new leads as soon as they are added to the system.
Tips for Success:
- Start with basic automations, such as sending follow-ups for “Hot Leads” or reminders for “Appointment Set” statuses.
- Regularly review and refine your flows to align with evolving lead management strategies.
- Combine automations with LeadIS’s filters and tags for more precise targeting.