Help Center
Business Account Settings Configuration
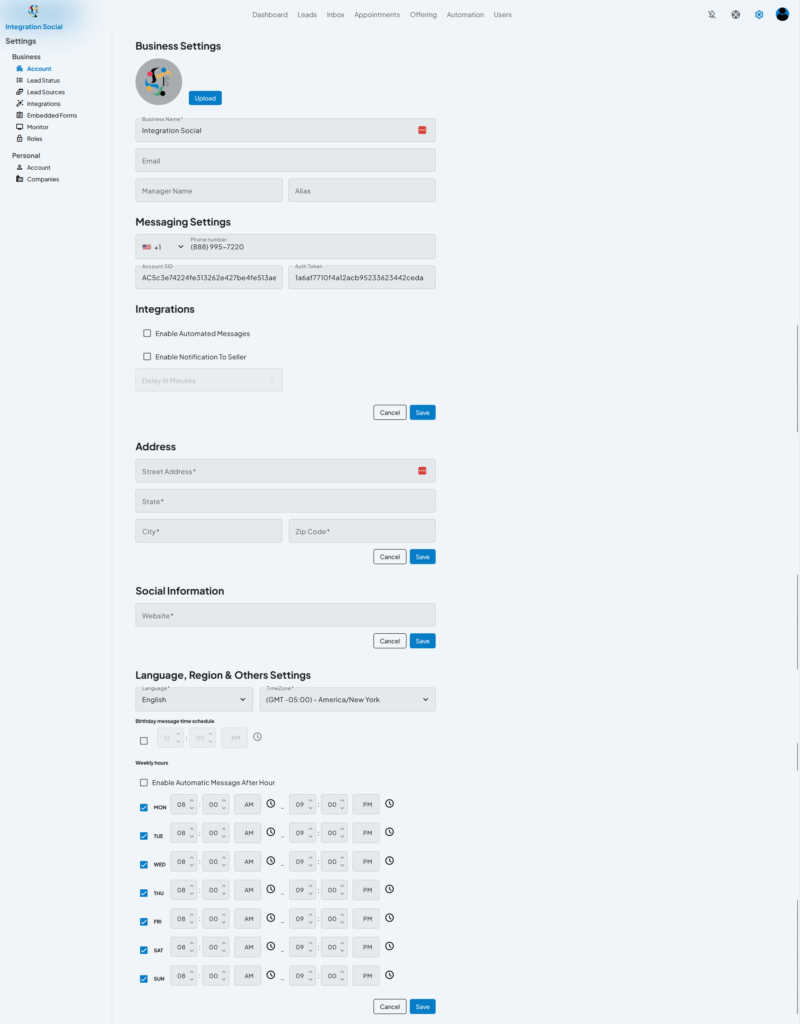
Introduction: The Business Account Settings in LeadIS allow you to configure your business details, messaging preferences, integrations, address, and other account-specific settings. These configurations ensure that your business operations within LeadIS are aligned with your workflow and communication needs.

Key Components of Business Account Settings:
Business Information:
- Business Name: Enter the name of your business.
- Email: Add the email address associated with your business.
- Manager Name and Alias: Specify the manager’s name and a friendly alias to personalize communications.
Messaging Settings:
- Phone Number: Add or update the phone number used for SMS communication.
- Account SID and Auth Token: Enter the credentials for integrating with your SMS service provider (e.g., Twilio).
Integrations:
- Enable Automated Messages: Toggle to activate automated messaging for leads.
- Enable Notification to Seller: Notify the seller when actions occur (e.g., lead response).
- Delay in Minutes: Set a delay time for notifications or automated messages to ensure proper timing.
Address:
- Enter your business’s street address, state, city, and ZIP code for location-based operations.
Social Information:
- Website: Add your business’s website URL for reference or lead redirection.
Language, Region, and Other Settings:
- Language: Select the default language for communication and platform settings.
- Timezone: Set your business’s default timezone for scheduling and automation accuracy.
- Birthday Message Time Schedule: Configure specific times to send birthday messages to leads.
- Weekly Hours:
- Specify your business’s operational hours for each day of the week.
- Enable Automatic Message After Hours: Toggle this option to automate after-hours responses for leads interacting outside regular business hours.
How to Configure Business Account Settings:
Access the Settings Module:
- Navigate to the Settings tab from the main navigation menu and select Account under the Business category.
Update Business Information:
- Fill in the required fields for your business name, email, and manager details.
- Upload your business logo by clicking the Upload button.
Configure Messaging Settings:
- Enter the phone number, Account SID, and Auth Token to integrate your messaging service.
- Enable automated messages and set notification delays if required.
Set Address and Social Information:
- Enter your business’s complete address and website for accurate representation.
Adjust Language, Region, and Other Settings:
- Select the language and timezone.
- Configure the birthday message schedule and weekly hours to reflect your business operations.
- Enable after-hours messaging for 24/7 communication with leads.
Save Changes:
- Click the Save button after making updates to ensure all configurations are applied.
Tips for Success:
- Ensure your messaging settings, such as phone number and integration credentials, are accurate to avoid communication issues.
- Regularly update your weekly hours and timezone to reflect any operational changes.
- Use the after-hours messaging feature to maintain consistent lead engagement outside of business hours.