Help Center
Lead Status Configuration
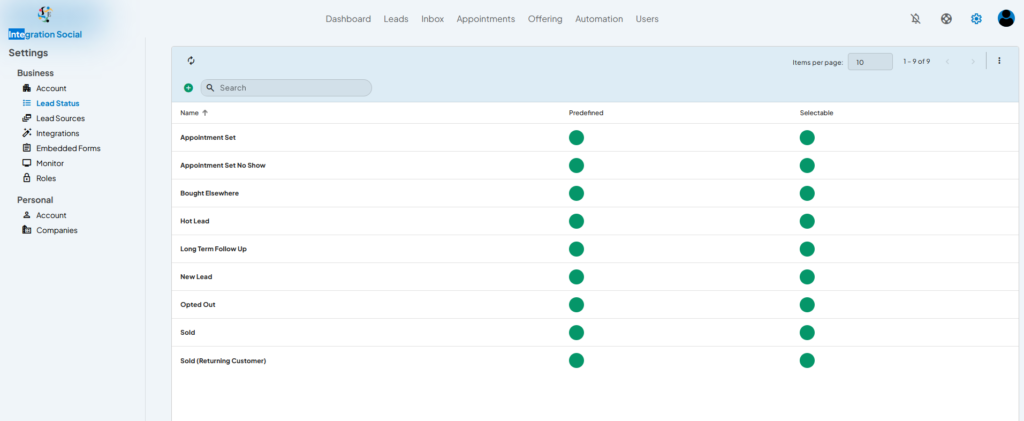
Introduction: The Lead Status Configuration in LeadIS enables businesses to define and manage lead statuses that reflect the stages of their sales or engagement processes. These statuses help organize and track leads efficiently, ensuring that each lead is managed appropriately according to its position in the pipeline.

Key Components of Lead Status Configuration:
Predefined Lead Statuses:
- LeadIS includes several predefined statuses that can be used out of the box, such as:
- Appointment Set
- Appointment Set No Show
- Bought Elsewhere
- Hot Lead
- Long Term Follow Up
- New Lead
- Opted Out
- Sold
- Sold (Returning Customer)
- LeadIS includes several predefined statuses that can be used out of the box, such as:
Selectable Lead Statuses:
- Each status can be marked as “Selectable,” allowing users to apply it to leads during updates or workflows.
Status Indicators:
- A green dot indicates that the status is predefined and/or selectable.
How to Configure Lead Statuses:
Access the Lead Status Settings:
- Navigate to the Settings tab from the main navigation menu and select Lead Status under the Business section.
View Existing Lead Statuses:
- Review the list of predefined statuses displayed in the main table.
- Check the Predefined and Selectable columns to see the attributes of each status.
Add a New Lead Status:
- Click the + button at the top-left corner to open the Create Lead Status form.
- Fill in the required details for the new status:
- Name: Provide a descriptive name for the status.
- Predefined: Decide if the status should be predefined.
- Selectable: Mark the status as selectable if it will be used frequently.
Edit or Delete Existing Statuses:
- Click the three-dot menu next to a status to edit or delete it.
- Adjust attributes such as name, predefined status, or selectable status as needed.
Example Use Case:
- Custom Status Creation:
- Add a new status named “Follow-Up Required” for leads needing additional attention after initial contact.
Tips for Success:
- Use predefined statuses to maintain consistency across your workflows.
- Regularly review selectable statuses to ensure they align with your sales process.
- Keep the lead status list concise and relevant to avoid confusion among team members.