Help Center
Leads
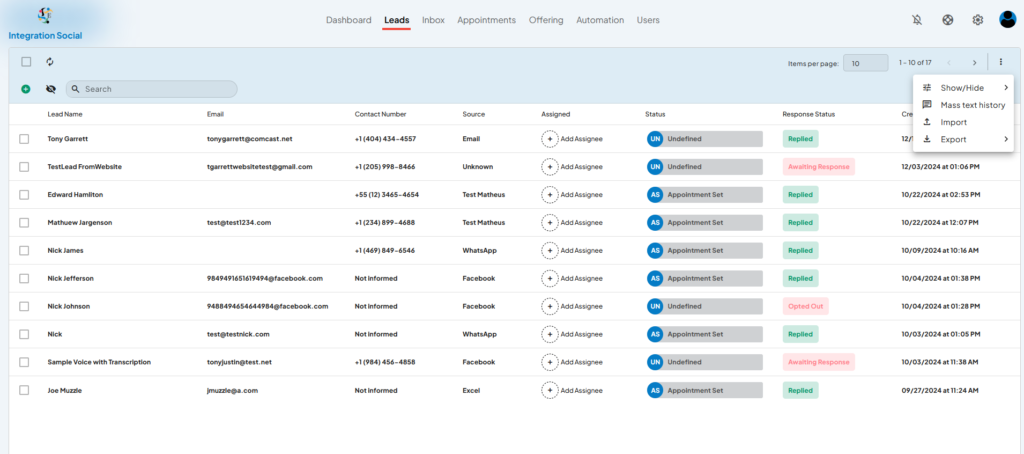
Introduction: The Leads Module in LeadIS allows you to manage and organize all your leads efficiently. It provides tools for bulk actions, lead assignment, and status updates, all in a user-friendly interface. This article highlights how to use the module, including selecting multiple leads and utilizing the three-dot menu for additional actions.


Key Features of the Leads Module:
Comprehensive Lead Overview:
- View all lead details, including:
- Name
- Contact Number
- Source (e.g., Facebook, WhatsApp, Email)
- Assigned Team Member
- Lead Status
- Response Status (e.g., Replied, Awaiting Response)
- Creation Date
- View all lead details, including:
Bulk Actions:
- Select multiple leads using checkboxes to perform actions such as:
- Assigning leads
- Updating lead statuses
- Sending mass text messages
- Adding tags
- Deleting leads
- Select multiple leads using checkboxes to perform actions such as:
Search and Filter:
- Use the search bar to find leads quickly by name, email, or phone number.
- Apply filters (e.g., All Leads) to display specific groups of leads.
Three-Dot Menu:
- Access additional actions for individual leads, such as:
- Show/Hide Fields: Customize which columns are displayed.
- Mass Text History: View past mass text campaigns.
- Import/Export: Import leads via CSV or export your current lead list.
- Access additional actions for individual leads, such as:
How to Use the Leads Module:
Viewing Lead Details:
- Navigate to the Leads Module from the top menu.
- View all lead details in the table, sorted by default creation date.
Selecting Multiple Leads:
- Use the checkboxes on the left to select multiple leads.
- Once selected, the action bar appears with options like:
- Assigning leads
- Sending mass text messages
- Adding or updating tags
- Deleting selected leads
Using the Three-Dot Menu:
- Click the three-dot menu in the top-right corner to access additional tools:
- Show/Hide Fields: Customize the visible columns to focus on relevant data.
- Mass Text History: Review and track mass text campaigns sent to leads.
- Import Leads: Upload a CSV file to bulk-add new leads to the system.
- Export Leads: Download your current lead list in CSV format for offline use.
- Click the three-dot menu in the top-right corner to access additional tools:
Assigning Leads:
- Click the “Add Assignee” button next to a lead to assign it to a team member.
Updating Lead Status:
- Click the status button (e.g., “Appointment Set”) to change the lead’s current status.
Sending Mass Text Messages:
- Select multiple leads and click the Mass Text button to send a bulk message.
Tips for Success:
- Use the search bar and filters to quickly locate specific leads or groups.
- Regularly update lead statuses and assignments to keep your workflow organized.
- Leverage the mass text feature to engage multiple leads at once while maintaining personalization.